Everybody wants an organized environment to live the same way you would like your phone to be the same. This article will teach you how to block unwanted emails on your iPhone so you can focus more on what matters the most. Keeping your inbox clutter-free from unwanted emails will let you enjoy the best email experience on your iPhone.

It is frustrating when your email inbox contains unwanted emails and emails from unknown persons. For many purposes, people usually send you emails; one such annoying is promotional emails. Inbox gets full of promotional emails, and family and friends keep sending you unnecessary emails. Finding useful emails from the long and unread list takes a lot of work in that scenario. It is time-consuming to clear out those unwanted emails; fortunately, there are ways to block them on your iPhone.
How to Block Unwanted Emails on iPhone:
In this article, you will learn how to block unwanted emails on your iPhone. In two ways, you can block emails.
-
Block Emails From Mail App:
- Open your email app from your iPhone.
2. Look for the email you want to avoid receiving from the inbox list.
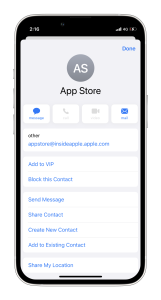
3. Tap on the sender’s contact information at the top of the screen.
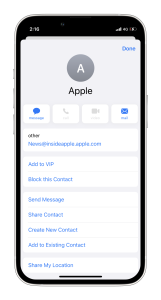
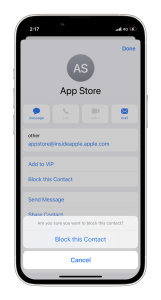
4. A window will appear from the button on the screen; you will see ” Block this Contact” tap on it.
5. Another child window will appear ” Are you sure you want to block this contact? “, tap on “Block this Contact”.
6. Similarly, you can block another email account individually.
7. You will no longer receive emails from that blocked account.
-
From Your iPhone Settings:
- Go to Settings on your iPhone, then tap the ‘Mail’ option.
- Tap ‘Accounts’ here you will find all the email accounts connected to your iPhone.
- Select the Account you want unwanted emails blocked from.
- Tap on the ‘Advanced’ option; the options will show information about the email from where you want to block emails.
- Click on the ‘Blocked’ option; it will show all the emails you previously blocked. By entering a new Email ID with a comma, you can add more emails you want to block emails from.
- Now select ‘Done’, to complete the Setting changes.
- You can check your inbox to make sure you have blocked the email. You will find no more new emails from those blocked email IDs.
Blocking unwanted emails from unknown, promotional, or from the person or organization you do not want mail anymore will keep your inbox clutter-free. You will stay energized and focused while searching for useful emails in your inbox. We hope the above tips will help you block unwanted emails on your iPhone. If this article is helpful, share this with your friends and family who need this.